Today, we’ll show you how to fix the Disney Plus black screen issue or why Disney Plus isn’t working on your Mac.
This problem is showing worldwide, so don’t worry; you are not the only one to face it.
So the matter is that every time we log in to Disney Plus on a MacBook, it shows us a black screen, and we cannot tell whether we are logged in. For this reason, we had to close the page.
This issue is not with a particular web browser but shows up in every browser, like Safari and Firefox.
We have found three solutions, and they will surely help you fix it quickly. Now, without any more discussions, let’s look at the solutions.
You may also like How To Cast to Firestick from Android, iOS, and PC.
Table of Contents
- 3 Methods to fix Disney plus Black screen issue
- Related Video: Fix Disney plus login black screen
- Conclusion
- Related FAQs
3 Methods to fix Disney plus Black screen issue
Method 1: Turn off Extensions and VPN
In this first solution to fix this issue, we need to check our web browser. So first, we have to check our internet connection to see whether it is stable. To test this, we can visit any internet speed test website.
After that, we can begin testing to see how to fix the Disney Plus black screen problem. A few steps are included in the solution, so follow those steps one by one carefully.
Step 1: Turn OFF the VPN
In this first step, turn off your VPN if it is ON. If it is off, leave it as it is; there is nothing to do with this. Now, let’s get into our second step.
Step 2: Turn off the ad blocker
- To turn off the ad blocker, click on the three vertical dots at the top right of your Chrome browser.
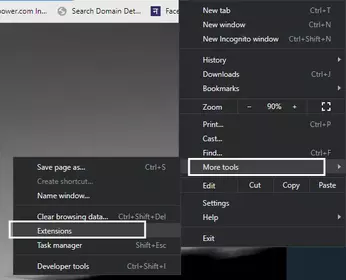
- Then go to More Tools, and then click on Extensions.
- After clicking on the extensions, you will land on a page where you can see your installed extensions.
- Then, turn off the ad blocker. Turning off ad blockers will be sufficient, but we recommend you turn them all off.
Step 3: Delete the browser’s cache files and cookies
Deleting your cache files and cookies will help your browser browse more seamlessly and efficiently.
- To get this setting, click on the three vertical dots at the top right of the Chrome browser. Then go to Settings.
- After this, enter the privacy and security section on the left. Then click on the Clear browsing data.
- After this, you will be shown a small segment where you must tick all three boxes, set the time range to all times, and click on Clear Data.
It should be noted that after clicking the “clear data” button, all browsing data will be cleared, and you will have to log in again to your browser.
After all, this process checks whether your problems are solved or not. If it still exists, then here is our second solution for it:
Method 2 (for Windows): Change your DNS Address

The second solution is basically to change your DNS address. Here, we have nothing to do with the browser. All the work will be on the control panel.
So close the browser if it is open, and go to the home screen of the PC. This does not include multiple steps; it has a single-step solution. So let’s jump into it.
- As discussed above, this whole process will be in the control panel.
- After opening the control panel, click on View network status and tasks. Now, click on the internet we are connected to in the connection section.
- After doing this, enter the properties and double-click on Internet Protocol Version 4.
- Now tick “use the following DNS server address,” and then you will see a small page with two blank bars.
- Write 8.8.8.8 in the first blank and 8.8.4.4 in the second blank. We arrived at the end of this process, pressed OK, and closed this place.
Method 3: Install the Application
Our third solution is to use or open the App via Microsoft or the App Store directly. We have seen that opening through the App Store, or Microsoft Store will be helpful if there is a bug in the browser or App.
There is nothing to do in this step: Go to the Microsoft Store or App Store, search ‘Disney Plus’ on the search bar, and press enter. After this, click the get option shown after the Disney Plus Application logo.
Then, after downloading, click on the “open” option to open the application and check whether the problem is solved.
Related Video: Fix Disney plus login black screen
Conclusion
We hope you found the post on how to fix Disney Plus black screen issue or why Disney Plus isn’t working on my Mac helpful.
Disney Plus will be the only place to stream all new live-action and animated films, series, and shorts from Disney’s legendary film library, along with various original content.
Disney Plus is where you’ll find Disney’s biggest stars and newest voices, unforgettable stories, and magic moments across the Disney universe.
In the last few days, many people have been experiencing the same problem: the Disney+ black screen. So we have written this article to solve it.
If you have any other issues with your Disney account, comment, and we will try our best to help you.
Related FAQs
Why does my Disney Plus keep buffering?
The main reasons why your Disney Plus is not working or showing a black screen-
– Internet connection instability
– Slow Internet connection
– The resolution is set too high.
– missing system files
Why won’t Disney Plus work on my Mac?
While playing Disney Plus, several MacBook Air users are experiencing problems. Here are some ways to fix Disney Plus not working on MacBook Air & Pro –
– Try using a different network or IP address.
– Contact Disney support
– Disable Adblock and remove any add-ons
Why is Disney Plus buffering on Firestick?
It could be a reason that you have exceeded the limit of streaming activities, and your internet service provider slowed down your internet temporarily.

Hello, Myself Rana, the founder of Bugswave.com, where I assist others with their technological problems and guide them through the process of resolving them.
