If you want to compile C or C++ programs on Windows, you may have come across MinGW-w64. Many older tutorials recommend downloading mingw-w64-install.exe to install MinGW-w64 and set up the GCC compiler. The installation is straightforward, but you still need to choose the right architecture, thread model, and exception model for your system.
The process is not difficult, but there is one thing you should know before starting. The mingw-w64-install.exe file available through the old SourceForge installer folder is from 2017, not 2024. SourceForge lists the file as modified on January 15, 2017.
So, if you are following an older guide and cannot get the EXE installer to work, you are not necessarily doing something wrong.
In this guide, I’ll explain how the MinGW-w64 EXE installation works, which options to choose, how to add it to Windows PATH, and how to check that GCC is working. I’ll also explain what to do if the old installer does not work on your PC. And you may also like How to Contact Snapchat Support.
Table of Contents
- What is MinGW-w64?
- What is mingw-w64-install.exe?
- Before you install MinGW-w64
- How to install MinGW-w64 using the EXE?
- How to add MinGW-w64 to PATH?
- Test MinGW-w64 with a C program
- What if mingw-w64-install.exe does not work?
- Common MinGW-w64 installation problems
- Do you need MinGW-w64 for C and C++?
- Related Video: How to Install MinGW (GCC/G++) Compiler
- Conclusion
- Related FAQs
What is MinGW-w64?
MinGW-w64 is a collection of Windows headers, libraries and tools that works with a compiler such as GCC or LLVM. Together, these components provide a development environment for building native Windows applications.
You can use MinGW-w64 for:
- C programming
- C++ programming
- Compiling Windows applications
- Creating .exe files
- Using GCC on Windows
- Building projects with Make and other development tools
- Working with editors such as Visual Studio Code
One thing that often causes confusion is the difference between MinGW-w64 and GCC. They are not exactly the same thing.
GCC is the compiler collection. MinGW-w64 provides the Windows-specific headers, libraries and runtime components needed to build native Windows programs.
That is why most people install a complete pre-built toolchain rather than installing MinGW-w64 by itself. The official MinGW-w64 project recommends pre-built toolchains that combine MinGW-w64 with GCC or another compiler.
What is mingw-w64-install.exe?
mingw-w64-install.exe is an older online installer associated with the MinGW-w64 mingw-builds toolchain.
The SourceForge page still lists the file, and it is available for download. However, the file itself was last modified in January 2017. Its listed SHA-256 checksum is:
19b9a267a5b79913bf6a3a53cda83c3f7711cb6c879d48ccb97b4ed15c21fcf1
This matters because many articles still refer to this file as though it were a current installer.
It isn’t a 2024 release.
If you specifically need the old EXE because you are following a course, tutorial or existing setup guide, you can still find it on the MinGW-w64 SourceForge project.
But if your goal is simply to get a working GCC and MinGW-w64 environment on a modern Windows computer, I would use a current pre-built toolchain instead.
Before you install MinGW-w64
Before starting, check whether your Windows installation is 64-bit.
Most modern Windows computers use 64-bit Windows. If yours does, an x86_64 MinGW-w64 toolchain is normally the appropriate choice.
You can check this by opening:
Settings > System > About
Look for System type.
If Windows reports a 64-bit operating system, choose an x86_64 or 64-bit toolchain.
How to install MinGW-w64 using the EXE?
If you specifically want to use mingw-w64-install.exe, follow these steps.
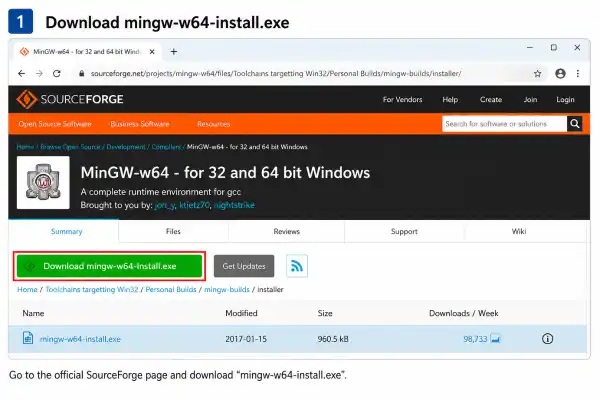
Step 1: Download mingw-w64-install.exe
Download the installer from the MinGW-w64 SourceForge project.
Download mingw-w64-install.exe from SourceForge
Keep in mind that this is an old installer. The SourceForge file listing shows a 2017 modification date.
Step 2: Open the installer
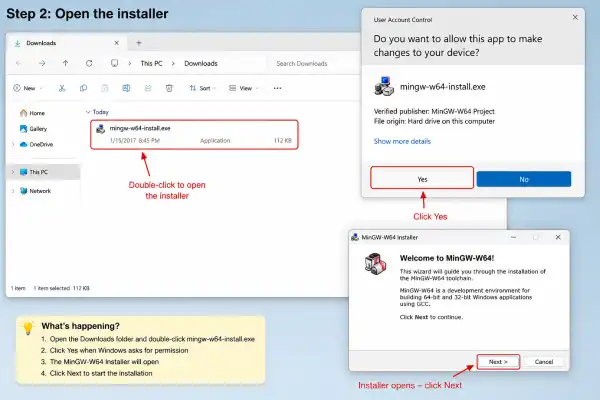
After downloading the file, open:
mingw-w64-install.exe
Windows may ask for permission to run the program.
Click Yes if you want to continue.
The installer should then open and ask you to choose the toolchain settings.
Step 3: Choose the architecture
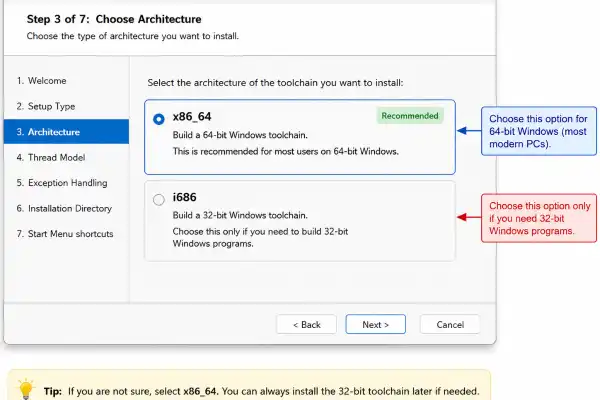
You may see an option called Architecture.
For a normal 64-bit Windows computer, choose:
x86_64
This creates a 64-bit Windows toolchain.
If you specifically need to build 32-bit Windows programs, you can choose:
i686
For most new projects, x86_64 is the sensible choice.
Step 4: Choose the thread model
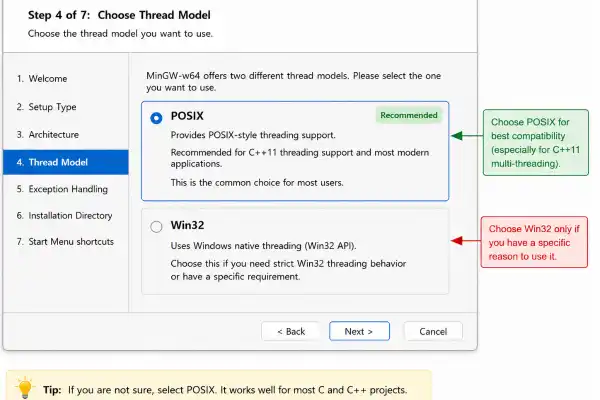
Older MinGW-w64 builds may ask you to select a thread model.
You may see:
POSIX
Win32
For the traditional MinGW-w64 builds, POSIX is a common choice, particularly when C++11 threading support is needed.
Don’t worry too much about this option if you are just starting out. It controls how threading support is provided by the toolchain.
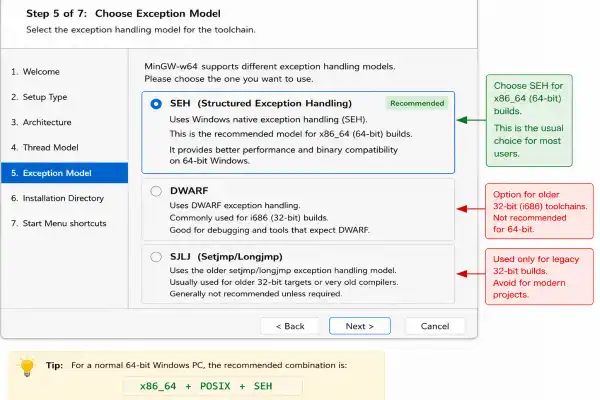
Step 5: Choose the exception model
The installer may also show an exception option.
For an x86_64 build, you may see:
SEH
SEH stands for Structured Exception Handling and is the usual exception model associated with 64-bit MinGW-w64 builds.
Older 32-bit toolchains may use options such as DWARF or SJLJ.
If you are installing MinGW-w64 for a normal 64-bit Windows PC, the common combination in older mingw-builds releases was:
x86_64 + POSIX + SEH
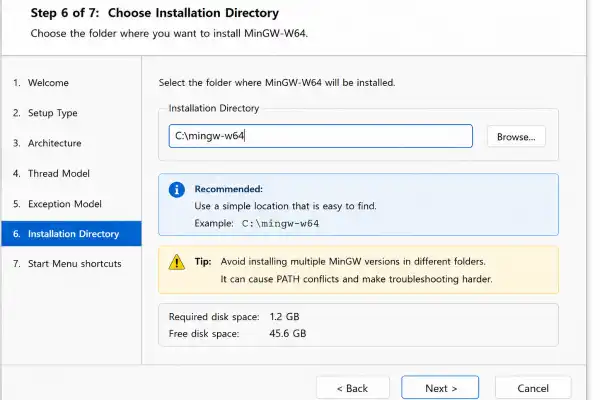
Step 6: Choose the installation folder
The installer will ask where you want to install the toolchain.
You can use a simple location such as:
C:\mingw-w64
or another folder that you can easily find later.
Try not to install several different MinGW versions into random folders. Having multiple GCC installations can make PATH problems much harder to diagnose.
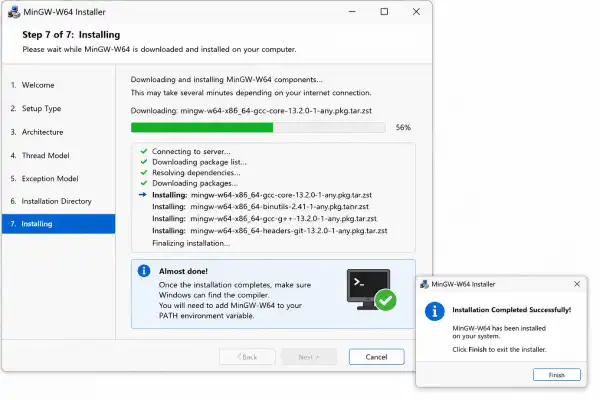
Step 7: Complete the installation
Continue through the installer and let it download and install the required files.
The online installer needs an internet connection because it downloads the selected toolchain components.
Once the installation finishes, you need to make sure Windows can find the compiler.
How to add MinGW-w64 to PATH?
PATH is one of the most important parts of the installation.
Windows uses the PATH environment variable to locate programs when you type commands such as:
gcc
or:
g++
If the MinGW-w64 bin folder is not in PATH, Windows may show an error such as:
‘gcc’ is not recognized as an internal or external command
Find the bin folder
Open the folder where you installed MinGW-w64.
You should eventually find a directory containing files such as:
gcc.exe
g++.exe
gdb.exe
This is normally the bin folder.
For example, it could look like:
C:\mingw-w64\mingw64\bin
The exact path depends on where the toolchain was installed.
Add the folder to PATH
On Windows:
- Press the Windows key.
- Search for Environment Variables.
- Select Edit the system environment variables.
- Click Environment Variables.
- Under User variables or System variables, find Path.
- Click Edit.
- Click New.
- Add your MinGW-w64 bin folder.
- Click OK to close the windows.
For example:
C:\mingw-w64\mingw64\bin
After changing PATH, close any Command Prompt windows that were already open.
Then open a new Command Prompt.
Check if MinGW-w64 is working
Open Command Prompt and type:
gcc –version
Press Enter.
If everything is configured correctly, Windows should display GCC version information.
You can also check the C++ compiler with:
g++ –version
And you can check the debugger with:
gdb –version
If these commands return version information, your PATH configuration is working.
If Windows says that gcc is not recognized, don’t reinstall everything immediately. Check the PATH setting first.
Test MinGW-w64 with a C program
I recommend doing a small test before moving on to a larger project.
Create a file called:
hello.c
Add this code:
include
int main(void)
{
printf(“Hello, Windows!\n”);
return 0;
}
Save the file.
Open Command Prompt in the same folder and run:
gcc hello.c -o hello.exe
If the compiler is working, you should see a new file called:
hello.exe
Run it with:
hello.exe
You should see:
Hello, Windows!
This confirms that GCC can compile your C code into a Windows executable.
The MinGW-w64 documentation uses the same basic idea, compiling a small C program and running the resulting Windows executable.
What if mingw-w64-install.exe does not work?
This is where many older tutorials become confusing.
If the EXE installer gives you an error, I would not spend too much time trying to force the old installer to work.
The SourceForge installer directory shows that mingw-w64-install.exe is from 2017.
The MinGW-w64 project now provides a list of pre-built toolchains, including MSYS2, MinGW-W64-builds, WinLibs and other options.
So you have better options.
Install MinGW-w64 with MSYS2
MSYS2 is one of the better choices if you want a maintained development environment.
The MinGW-w64 project lists MSYS2 as a pre-built toolchain option. It provides different environments, including MINGW64 and UCRT64.
For modern 64-bit Windows development, UCRT64 is one of the environments you may encounter.
MSYS2 also uses the pacman package manager, which makes installing and updating development tools easier.
This approach is different from downloading one old EXE installer, but it is usually easier to maintain over time.
Install MinGW-w64 with WinLibs
Another option is WinLibs.
WinLibs provides standalone MinGW-w64 and GCC builds for Windows.
One useful thing about WinLibs is that you do not have to run a traditional installer. The packages are distributed as .zip or .7z archives. You extract the archive and use the compiler from the mingw32\bin or mingw64\bin directory.
For someone who wants a portable GCC installation without a package manager, this can be a straightforward option.
MinGW-w64 EXE vs MSYS2 vs WinLibs
Here is the simple difference.
| Option | Best for | Installation |
| mingw-w64-install.exe | Following an older tutorial | Old online installer |
| MSYS2 | Regular development and package management | Package manager |
| WinLibs | Simple standalone toolchain | Extract an archive |
If your school or tutorial specifically tells you to use mingw-w64-install.exe, follow that requirement.
Otherwise, I would choose a current toolchain from the MinGW-w64 project’s recommended list.
Common MinGW-w64 installation problems
GCC is not recognized
If you get:
gcc is not recognized as an internal or external command
check your PATH.
Make sure you added the folder containing gcc.exe, not the parent MinGW-w64 folder.
For example, this is the type of folder you need:
C:\mingw-w64\mingw64\bin
After changing PATH, open a new Command Prompt and try:
gcc –version
The compiler is installed but VS Code cannot find it
This can happen when GCC works in Command Prompt but your editor cannot locate it.
First run:
gcc –version
in Command Prompt.
If that works, your compiler is probably fine. The problem is more likely related to your VS Code compiler or C/C++ extension configuration.
You have more than one MinGW installation
This is another common problem.
For example, you might have one GCC installation in:
C:\mingw64\bin
and another one somewhere inside:
C:\msys64
Windows uses the PATH order to decide which executable it finds first.
If you have multiple MinGW installations, check which GCC Windows is actually using with:
where gcc
This command can show the location of the GCC executable being found by Windows.
The old installer cannot download files
If the old online installer fails while downloading components, don’t assume that your internet connection is the problem.
The installer itself is old, and the current MinGW-w64 project recommends using pre-built toolchains rather than relying on the old installer.
Using MSYS2 or a current standalone MinGW-w64 build is usually the better route.
Do you need MinGW-w64 for C and C++?
If you want to use GCC to compile C or C++ programs directly on Windows, MinGW-w64 is one option.
You can use it with:
- C
- C++
- GCC
- G++
- GDB
- Make
- CMake
- Visual Studio Code
- Code::Blocks
- Other development tools
It is especially useful when you want a GCC-based Windows development environment without using Microsoft’s MSVC compiler.
Related Video: How to Install MinGW (GCC/G++) Compiler
Conclusion
The biggest thing to remember is that MinGW-w64 and the old mingw-w64-install.exe are not the same thing.
MinGW-w64 is still an important part of Windows development, but the old EXE installer is outdated. SourceForge lists that installer as a 2017 file, while the MinGW-w64 project currently lists several maintained pre-built toolchain options.
If you need the old EXE for a specific tutorial, you can use it and configure the installation with an x86_64 architecture, POSIX threads and SEH for a typical 64-bit Windows setup.
But if you are starting a new C or C++ project, I would look at a current toolchain such as MSYS2 or WinLibs instead.
Once GCC is installed, the easiest way to confirm everything is working is still:
gcc –version
Then compile a small program:
gcc hello.c -o hello.exe
If the .exe runs successfully, you are ready to start working with C or C++ on Windows.
Related FAQs
Is MinGW-w64 free?
Yes. MinGW-w64 is open-source software and is available for Windows development through several pre-built toolchain distributions.
Is MinGW-w64 the same as GCC?
No. GCC is the compiler collection, while MinGW-w64 provides Windows-specific headers, libraries and related components. A complete toolchain combines these components.
Should I choose x86_64 or i686?
Choose x86_64 if you are using a normal 64-bit Windows installation and want to build 64-bit programs. Choose i686 only when you specifically need 32-bit Windows compatibility.
How do I know if MinGW-w64 is installed correctly?
Open Command Prompt and run:
gcc –version
If GCC returns its version information, Windows can find the compiler. You can then compile a small C program to confirm that the complete setup works.